

How to Program Vocaloid for DTM Beginners

Many of you may be wondering how to produce with Vocaloid.
Here, we will clearly explain each step, one by one—from creating a song onward—for those who are new to DTM.
Use the included synth plugin
last timeI tried making it up to just before the chorus, so I went ahead and finished the chorus and turned it into one full verse-chorus section.
last timeI’d like to continue by introducing what we did.
Most DAWs have some kind of analog synth.Plugin...and more are included.
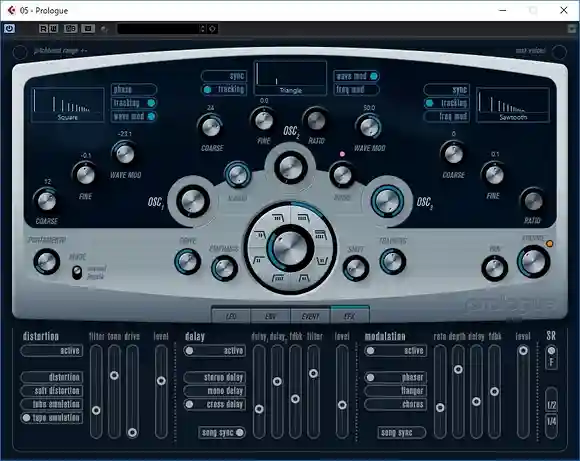
In Cubase, instruments like Prologue and Retrologue are examples of that.
Analog synthesizers can create a variety of sounds by using waveform synthesis and modulation.
The synth leads, pads, and other tones that come with the sampler were originallyanalog synthThere are also many tones that are created and sampled.
The characteristics of analog synthesizers include dramatically changing timbres when combined with elements like filters, as well as thick, powerful bass sounds.
This time, I used Prologue to create the swooping, rising sound right before the chorus and the finely moving synth tone right after the chorus, and I used Retrologue and Prologue to change the bass sound.
The chorus follows the melody straightforwardly.
The chorus melody ended up being lifted straight upward from the end of the B section.
In the one bar that bridges the B section to the chorus, we insert the previously mentioned rising “gyuruuun” sound.
By switching to a four-on-the-floor rhythm and changing the groove, it gives the impression that this is where the chorus begins.
What I'm doing is the same as up to this point, but since this is the chorus, I'm making things move a bit more flamboyantly.
You can make it this far using almost only the included sound sources.
Loops and other items used besides the included ones are also freely distributed materials.
Only the orchestra hits use a synth called Xpand!2, which is a product that can sometimes be sold very cheaply during sales.
Air Music’s all-in-one multi-instrument “Xpand!2” is 80% OFF | Computer Music Japan
You don’t need lots of high-quality sound sources to make it! So definitely give it a try.
Create the Vocaloid part
If we can prepare this much, it looks like we can start adding the Vocaloid parts.
It’s not impossible to have them sing just the melody first and build from there, but I think it’s easier to make adjustments after the accompaniment is in place, so you don’t have to redo things due to the melody getting buried by other timbres or because of volume adjustments.
Copy the melody track to create a track for the VOCALOID.
It’s useful to keep the original melody when you want to add harmonies or tracks with different movements. (This time, I’ve kept it because I plan to add harmonies later.)
If you select the region of the copied track and open it in the VOCALOID Editor, it will automatically assign the initial settings needed to have VOCALOID sing.
This time, I'll mainly be using the Vocaloid IA Rocks.
Compared to the standard IA, it has a slightly quicker attack and a clearer voice, making it easier to handle rhythmic phrasing in singing.
Adjustment of the vocaloid part
To be honest, I hadn’t thought about the lyrics at all up to this point, so I hurriedly came up with images that might fit the mood of the song.
Since it's technopop, I went for a space-like vibe.
The song’s tempo is 132, which isn’t particularly fast, but at this tempo sixteenth notes can end up feeling drawn out, and eighths or quarters can sound really sluggish.
While listening back, I will fix each spot that feels sluggish or where the sixteenth notes are dragging.
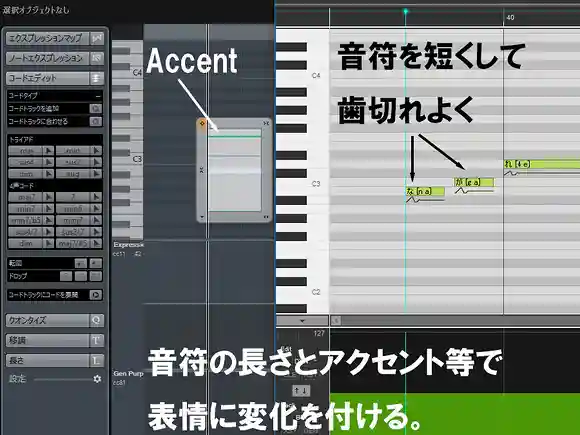
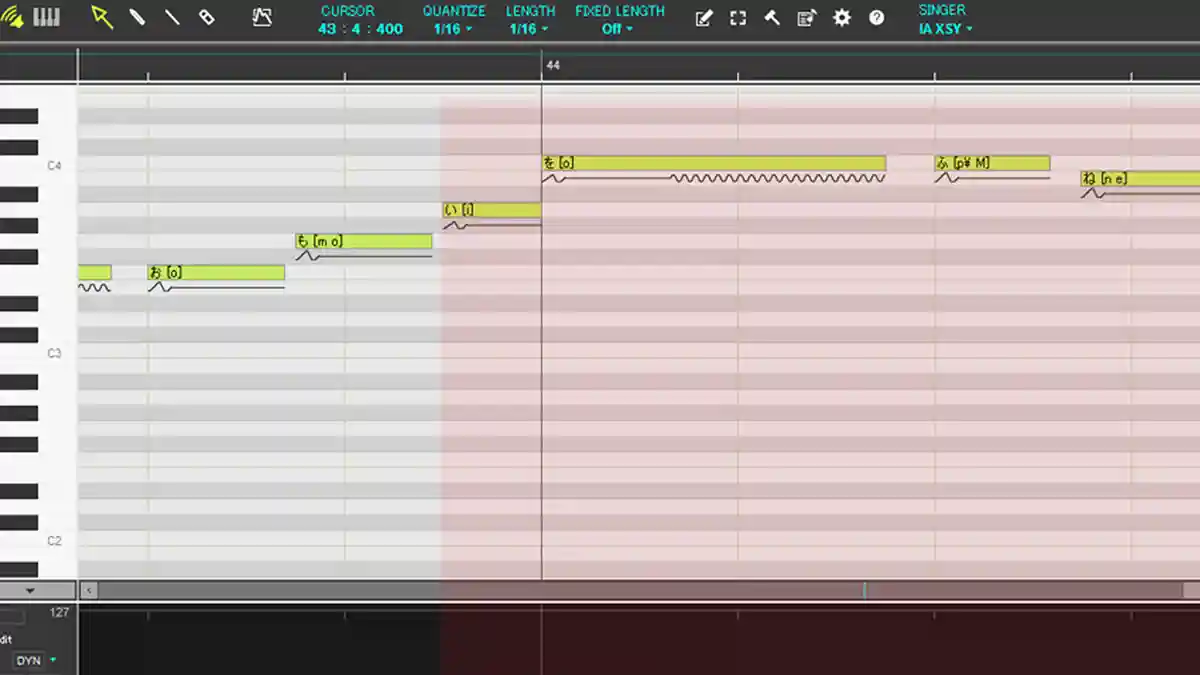
In sections with sixteenth-note movement, adjust the notes to be slightly shorter and set the Decay in the note properties to 0% or very low. This will produce a clearer voice with more definition.
If you lower the velocity here, it will feel sluggish in the backward direction, so set the velocity higher and reduce the dynamics (Dyn) to balance the volume.
Change the accent for each note articulation.
Unless you specifically want the note itself accented on the downbeat, it’s safer to keep consonants like “s,” “h,” and “n” relatively de-emphasized.
For the “sa” and “ha” rows, emphasizing the accent too strongly also increases the sibilant sounds (the hissing sounds like “shi” or “su”), which can be piercing to the ear, so it’s better not to raise the accent more than necessary.
If you can adjust the accent and volume to some extent, that alone lets you make it sing in a way that sounds fairly natural.
Add expression after consolidating the rhythm
Editing a Vocaloid part involves more than just rhythm and volume.
- Clarity (CLR) and Brightness (BRI) that make parts prone to getting muddy sound brighter and more present.
- Dynamics (DYN) that adjust volume
- Gender factor (GEN) for adjusting voice quality
- And cross-synthesis (XSY), which morphs voice types
Even if we don’t use all of them, we’ll adjust the expressions after adjusting things like rhythm and volume.
If you try to tweak the rhythm after finishing the expressive input, it becomes a real hassle, so I don’t recommend it for beginners.
Volume adjustment
First, we’ll adjust DYN roughly.
Decide on a pitch that will serve as a general reference within the vocal pitch range, and adjust the DYN to match the volume at that pitch.
Even though it's impossible to eliminate variation completely, we need to adjust it to some extent; otherwise it will be inconvenient when we compile everything later, so we'll make adjustments while playing it back.
There’s a tendency to lower the volume for pitches below the reference pitch and to raise it slightly for pitches above, so try adjusting while watching the meter.
Adjust specific parts individually, such as sounds you want to accent or sounds you don't want to pronounce clearly.
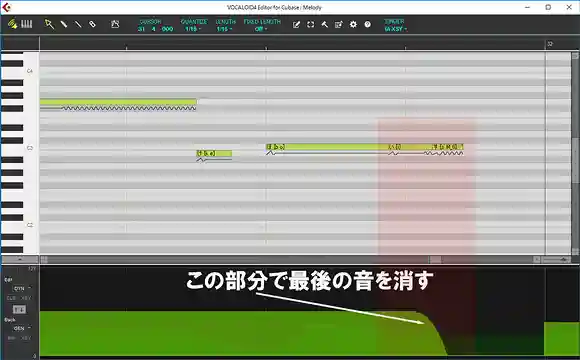
In this song, the second time the phrase “todoke boisu” appears in the vocal A section, the final “s” in “boisu” is closer to a voiceless English pronunciation, so I’ve marked it as voiceless by adding “_0” to the phonetic symbol.
As is, the last sound stretches out like “boi(su),” so I’m using DYN to cut it short by fading the sound out.
Since the high notes in the B-melody are where the singing style shifts to projecting the voice, I raised the DYN slightly to make them stand out.
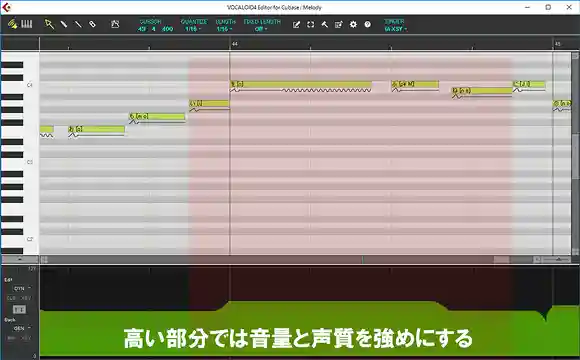
Voice quality adjustment
This time I’m having it sung at a relatively low pitch, so I’ve set the base GEN lower.
For lower registers, raising GEN makes the voice more androgynous, but it also tends to introduce growliness and inconsistent volume, so it’s best to learn the quirks of the specific Vocaloid you’re using and adjust accordingly.
Also, when there’s a large pitch range, low GEN tends to make the high notes sound thin, so for higher notes I aim a bit on the exaggerated side and raise the GEN value to adjust.
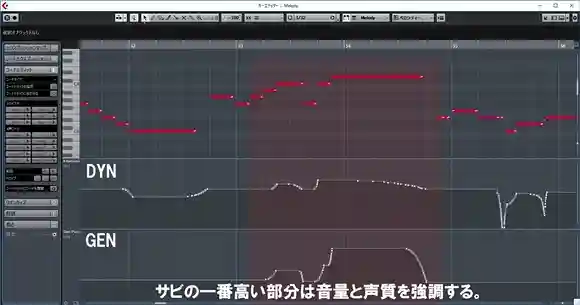
This time, I’ve adjusted it a bit excessively so that the changes in both volume and voice quality are clearly noticeable, so I think it should be easy to understand how it changes.
If you first adjust things to broadly set the direction, then repeatedly refine them little by little, you can enhance expressiveness.
If the backing track and melody are done, it’s (for now) complete.
If you output all parts together, it will be complete for the time being.
Overall, the tone matching and ad-libs aren’t fully refined yet, so I’d like to keep adjusting this track.
There are various ways to mix depending on the genre and direction, so please refer to the articles on mixing and try out different approaches.
Even with just the built-in sound sources that come standard, you can do a lot of things.
Anyway, let’s try to make it into a tangible form—starting with just one is fine.
Of course, you don’t have to produce an entire track with programming—it's also handy to use it partially, inserting sound effects or Vocaloid vocals.
If you just want to add a little, you won’t need any expensive setups or tools, so please feel free to give it a try.